Install getML on macOS
This installation guide explains all necessary steps to install getML on macOS. To download the getML suite, go to
and click the download button. This will download a disk image containing everything you need to use getML: The getML engine, the getML monitor, and the Python API.
System requirements
Your Mac should meet at least the following requirements to successfully install getML
macOS must be version 10.14 or newer. You can check your macOS version by running the following command in a terminal:
sw_versPython 3.7 or above must be installed on your machine. Furthermore, numpy and pandas are required dependencies for the getML Python API.
Install and run the getML engine and monitor
The getML engine is the C++ backend of getML. It comes with a graphical user interface - the getML monitor - that runs in your browser. To install these components
Double-click the
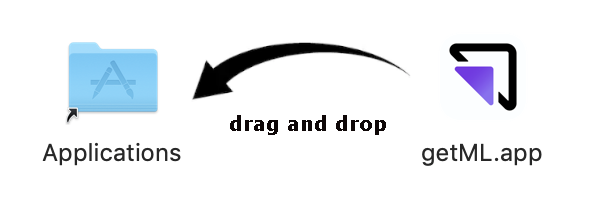
dmg-file to open the installer, then drag the getML Icon into the Applications folder.

Double-click getML.app in the Applications folder to start getML. A security feature in macOS will ask you to confirm that you want to open getML when launching it for the first time. After confirmation the getML icon in your status bar indicates that the getML engine is running.

Open a browser and visit http://localhost:1709/ (if opening the getML.app did not point you there automatically).
Install the getML Python API
The Python API is a convenient way to interact with and to control the getML engine. There are two options to install the getML Python API
From PyPI
In a terminal execute the following command to install the remote version from the Python Package Index
pip install getml
To make sure that the Python API was installed properly, you can use
python -c 'import getml'
Install the getML-CLI
getML comes with a command-line interface (CLI) that lets you configure the most important parameters on startup. The CLI is a standalone Go-binary. The CLI is optional. If you are fine with launching getML from your Launchpad, you can stop reading.
Before you can use the CLI, you have to have launched getML from your Launchpad
at least once. This is because when you launch getML for the first time,
it creates a hidden folder in your home directory (called .getML) into
which it copies the binaries and all necessary resources.
Said hidden folder is then accessed by the CLI.
After launching getML for the first
time, you can find the CLI in $HOME/.getML/getml-VERSION.
./getml-cli
You can move getml-cli anywhere you want. We recommend moving the getml-cli
to a location included in the PATH environment variable,
such as /usr/local/bin. You can inspect the content of the
aforementioned variable in a shell using
echo $PATH
and check if it can be properly found by executing
which getml-cli
If you see the location you moved the binary to as output, you are ready to go.
For further help on how to use the CLI, just use getml-cli -h or getml-cli -help:
Uninstall getML
To uninstall getML from your Mac
Drag
getml.appfrom your applications folder into the trash.Remove the folder
.getMLfrom your home directory. To do so, open your Finder and go to your home directory (Cmd + Shift + H). Hit Cmd + Shift + . to show the hidden files. Identify.getMLand move it to the trash.Delete
getml-clifrom wherever you have put it (if you have decided to installgetml-cli).
Where to go next
The Getting started guide provides an overview of the functionality of getML and a basic example of how to use the Python API. In order to get help or provide feedback, please contact our support.